Are you looking for affordable and sustainable furniture options for your building’s outdoor space? Upcycling may be the solution you’re looking for. Not only does upcycling reduce waste, but it also creates unique and personalized pieces that add character to any outdoor area. In this article, we’ll explore some of the best DIY upcycled furniture ideas for your building’s outdoor space and provide step-by-step instructions on how to create them.
I. Introduction
A. Explanation of upcycling and its benefits
Upcycling is the process of transforming old or unused items into something new and useful. Unlike recycling, which breaks down materials into their raw components, upcycling gives new life to existing items without the need for additional resources. By upcycling, we can reduce waste, save money, and create unique and personalized pieces of furniture.
B. Brief overview of the article
In this article, we’ll focus on upcycling furniture for your building’s outdoor space. We’ll start by discussing the best materials for upcycling and where to find them. Then, we’ll provide some DIY upcycled furniture ideas, including pallet furniture, tire furniture, and crate furniture. We’ll also provide step-by-step instructions on how to create each piece of furniture. Finally, we’ll share some tips for maintaining upcycled furniture and conclude with a recap of the benefits of upcycling.
II. Finding and selecting materials
A. Best materials for upcycling
When it comes to upcycling furniture for your building’s outdoor space, some materials work better than others. The best materials for upcycling are typically those that are sturdy, weather-resistant, and readily available. Some of the best materials for upcycling furniture include pallets, tires, and crates.
B. Where to find materials for upcycling
You can find materials for upcycling in a variety of places. Local businesses and construction sites are great places to find pallets, while tire shops are a good source for old tires. You can also check online marketplaces like Craigslist and Facebook Marketplace for free or cheap materials. Additionally, some recycling centers may accept items that can be upcycled.
C. How to select materials for upcycling
When selecting materials for upcycling, it’s important to choose items that are in good condition and free from any major damage or defects. You should also consider the size and shape of the item and how it will fit into your outdoor space. Finally, think about the style and aesthetic you’re going for and choose materials that will complement your existing decor.
III. DIY Upcycled Furniture Ideas
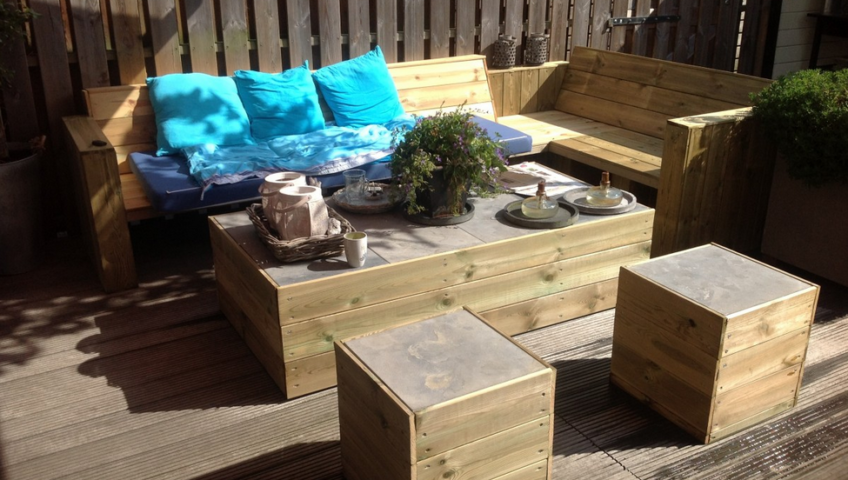
A. Pallet furniture
Pallets are a popular material for upcycling furniture due to their durability and versatility. Here are two DIY pallet furniture ideas for your building’s outdoor space:
 Image by sergio venuto via flickr
1. Pallet sofa
A pallet sofa is a great way to create seating for your outdoor space. To make a pallet sofa, you’ll need the following materials:
- Pallets
- Cushions or outdoor pillows
- Sandpaper
- Paint or stain (optional)
To make a pallet sofa, follow these steps:
- Sand the pallets to remove any rough edges or splinters.
- Paint or stain the pallets if desired.
- Stack two pallets on top of each other to create the base of the sofa. Use screws to attach them together.
- Stack the remaining pallets on top of the base to create the back of the sofa. Use screws to attach them together.
- Add cushions or outdoor pillows to the sofa for added comfort.

2. Pallet coffee table
To complement your pallet sofa, a pallet coffee table is an easy and functional addition to your outdoor space. Here are the materials you’ll need to create one:
- One or two pallets
- Sandpaper
- Paint or stain (optional)
- Four caster wheels or Legs
To create a pallet coffee table, follow these steps:
- Sand the pallet(s) to remove any rough edges or splinters.
- Paint or stain the pallet(s) if desired.
- Attach caster wheels or legs to the bottom corners of the pallet(s) using screws.
- Flip the pallet(s) over and your coffee table is ready to use!
 Adoscam, CC BY-SA 4.0, via Wikimedia Commons
B. Tire furniture
Tires are a versatile material for upcycling furniture due to their durability and unique shape. Here are two DIY tire furniture ideas for your building’s outdoor space:
1. Tire ottoman
A tire ottoman is a fun and functional piece of furniture that can be used as a footrest or additional seating. To create a tire ottoman, you’ll need the following materials:
- One or two old tires
- Rope or twine
- Foam cushion or outdoor pillow
- Fabric
- Scissors
- Hot glue gun
To create a tire ottoman, follow these steps:
- Clean the tire(s) thoroughly.
- Wrap the tire(s) with rope or twine, securing with hot glue as you go.
- Cut a foam cushion or outdoor pillow to fit the top of the tire.
- Cover the foam cushion or pillow with fabric, securing with hot glue.
- Place the cushion on top of the tire and your ottoman is ready to use.
2. Tire planter
A tire planter is a creative and eco-friendly way to add some greenery to your outdoor space. To create a tire planter, you’ll need the following materials:
- One or two old tires
- Outdoor spray paint
- Potting soil
- Plants or seeds
To create a tire planter, follow these steps:
- Clean the tire(s) thoroughly.
- Paint the tire(s) with outdoor spray paint in the color of your choice.
- Fill the tire(s) with potting soil.
- Plant your desired plants or seeds in the tire(s).
- Water regularly and watch your tire planter come to life!
 Image by Hernán Piñera Via Flickr
C. Crate furniture
Crates are a simple and affordable material for upcycling furniture. Here are two DIY crate furniture ideas for your building’s outdoor space:
1. Crate bench
A crate bench is a functional and stylish addition to any outdoor space. To create a crate bench, you’ll need the following materials:
- Wooden crates
- Sandpaper
- Paint or stain (optional)
- Wood glue
- Screws
To create a crate bench, follow these steps:
- Sand the crates to remove any rough edges or splinters.
- Paint or stain the crates if desired.
- Attach two crates together side by side using wood glue and screws. Repeat with two more crates.
- Stack the two sets of crates on top of each other to create the bench base.
- Place the remaining two crates on top of the base to create the bench back.
- Secure the crates together with wood glue and screws.
- Add cushions or outdoor pillows to the bench for added comfort.
2. Crate bookshelf
A crate bookshelf is a creative and functional way to add storage to your outdoor space. To create a crate bookshelf, you’ll need the following materials:
- Four wooden crates
- Sandpaper
- Paint or stain (optional)
- Wood glue
- Screws
To create a crate bookshelf, follow these steps:
- 1.Sand the crates to remove any rough edges or splinters.
- Paint or stain the crates if desired.
- Stack two crates on top of each other to create the base of the bookshelf. Use wood glue and screws to attach them together.
- Stack the remaining two crates on top of the base to create the top of the bookshelf. Use wood glue and screws to attach them together.
- Place the bookshelf in your desired location and use it to store books or other outdoor items.
IV. Tips for maintaining upcycled furniture
To keep your upcycled furniture looking great, here are some tips for maintenance:
A. How to protect upcycled furniture from weather damage
- Use a protective sealant to prevent water damage and fading.
- Store furniture indoors during inclement weather or cover with a waterproof cover.
B. How to clean upcycled furniture
- Use a gentle soap and water solution to clean furniture.
- Avoid using harsh chemicals that can damage the finish or material.
C. How to update and refresh upcycled furniture over time
- Sand and repaint or re-stain furniture to refresh the look.
- Add new cushions or outdoor pillows for a quick and easy update.
VI. Conclusion
Upcycling furniture for your building’s outdoor space is a creative and sustainable way to create unique and personalized pieces without breaking the bank. By using materials like pallets, tires, and crates, you can create functional and stylish furniture that adds character to your outdoor area. Whether you choose to make a pallet sofa, a tire ottoman, a crate bench, or any other DIY upcycled furniture idea, the possibilities are endless. With a little creativity and some basic DIY skills, you can transform old and unused items into beautiful and functional pieces of furniture.
More Upcycled Furniture Ideas:
- 20 Smart and Stylish Ways to Repurpose Furniture
- Upcycled furniture ideas to try at home
- 20 Upcycling Furniture Ideas
- 12 Up-cycled Furniture Ideas for your home and garden
- Best Upcycled Furniture Ideas
- 25 Upcycling Ideas to Transform Your Old Stuff
- 20 Repurposed Furniture Makeover Ideas
- 25 Upcycled Furniture Ideas for a Fresh New Look
Featured Image CC0 Public Domain via pxhere


